Step-by-step guide on replacing your LCD and touch screen on the iPhone 7.
Note: To follow along, you will need to have the iPhone 7 screen replacement parts readily available at your disposal. These include front assembly, earpiece speaker, EMI shield, in addition to the display.
Since the introduction of iPhone 5S screens, the home button was paired with the logic board. When removing the old screen, make sure to keep the Touch ID/home button, as replacing it will make the phone unusable.

Necessary tools:
- Tweezers
- PL1 screwdriver
- PH00 screwdriver
- Y000 screwdriver
- Flathead screwdriver with a thin point
Replacement parts:
- iPhone 7 LCD and Touch Screen
- iPhone 7 Assembly Adhesive
- iPhone 7 Front Panel Assembly Cable Bracket
Note: The process is nearly identical for the iPhone 7 Plus screen replacement.
Step 1 – Turn off your iPhone
Note: try to discharge the battery past 25% as it will help prevent accidents in case the Lithium battery is accidentally punctured during the process.

Turn the phone off by pressing and immediately releasing the volume up button, then do the same for the volume down button. Press and hold the lock button until the screen shuts down, release when it seems to be off.
Step 2 – Remove a pair of screws

At the bottom of your iPhone 7, you will find two 3.4 mm screws you first have to take out. Use the PL1 screwdriver for the job. Note: it is strongly recommended to store your screws in special storage where they won’t get lost.
Step 3 – Preparation
At this point, it would be best to put on a pair of safety glasses to protect your vision from any debris that might fly free during the replacement process.
Lay duct tape over your iPhone’s screen. Cover the entire surface in case it is cracked, or around half of it if it’s not. Then, create a handle by folding the piece of duct tape that is connected to the phone’s screen at both ends.
Use a hair-dryer set to warm to heat the iPhone at the edges – this will make the adhesive holding it together malleable and allow you to continue further. As a rule, try not to make it too hot to the touch.
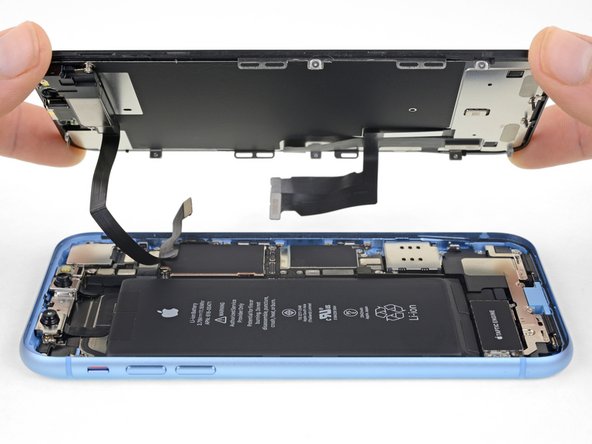
Step 4 – Detaching the display
Note: make sure you work carefully around from the top part of your phone, as well as the buttons, as you otherwise risk damaging some of the internal workings.

Pull your makeshift handle enough to create a narrow gap between the frame and the display.
Insert the flathead screwdriver’s tip into the opening. Moving to the sides, do your best to pry it off - this step may take some force. Don’t separate it yet! There are fragile ribbon cables still holding onto the screen. Rather, open carefully towards the sleep button’s direction.
Step 5 – Disconnecting the display
Using the Y000 screwdriver, get rid of the screws holding the battery in place. Next, detach the display connectors with the flathead screwdriver by lightly prying them off. Remove the two Phillips screws using the PH00 screwdriver and carefully remove the FaceTime connector using the flathead.

Once you’re finished, you can remove the display and put it aside.
Step 6 – Removing the Touch ID
Note: The Touch ID is connected to another connector, not to the mainboard. Be extremely careful when disconnecting it as its connecting cable is extremely sensitive and damage to it may make the button fully unusable.

Unscrew the 4 screws using the Y000 on the side where your home button is. Remove the bracket holding it and pry the connector open – with great care. Work very slowly, as this is one of the riskier parts of the whole operation. Loosen the connector cable by briefly heating it with warm air and then lifting it off the display using your pair of tweezers.
Step 7 – Insert the new display
Note: Make sure you have the right display. An iPhone 6 screen or iPhone X screen will not work and may lead to irreparable damage to your phone!
Use the Y000 screwdriver to remove screws at both sides of the display holding the heat shield in place. Remove any seals or mounts from your replacement display.
Attach the heat shield plate at exactly the right position and tighten the screws.
Step 8 – Retracing earlier steps
Re-install the home button using the reverse of the process described previously. Install the earpiece at the upper edge of the display. Do the same for the FaceTime camera. Note: make sure the microphone and sensors are correctly placed, otherwise you may experience issues.
Step 9 – Final steps
Attach the adhesive frame by placing it on the back cover and pressing it down firmly at each edge. Next, secure the FaceTime connector and the display and battery connectors.

Re-attach the display and finally fasten the screws at the bottom of the case.
Congratulations! You’ve completed your iPhone 7 screen replacement!
1 comment
Fiona Manonn
Yes, it has a good reason because iPhone is giving excellent feature and excellent feature apps that work well. The iPhone is one of the mobile devices that doesn’t follow others and it is providing the better mobile service in all ages people. And people using iPhone with joyous. I am an iPhone lover and I am using iPhone 5 which is strong and nice to look at. I love iPhone.